Friday, August 27, 2010

India Journal Completion

OK, Here are my cover boards for the India journal (see below/earlier blog entries for the beginnings of this journal if you are just tuning in). They have gel medium on them and are ready for the screening just above them there. This will make very durable hinges in the cover. Now, with the screening glued in I attached them to my painted paper grocery bag and flipped it over for you to see.
That all dried under a stack of magazines for a while today, then I cut it to size and folded and glued the edges over.

Below you see the paper signatures ready to bind into the cover ... but wait ...
See how the gluing didn't work so well? Pondering the situation I came up with a repeat cut border in metal tape to cover the errent edges and make them stick - but in a pretty way.
Here is the cut. You will see it set in a few photos down ...
Here I am punching the holes into the signatures according to a template carefully measured to fit the spine board.
There is the metal tape border. I like how it turned out. And here I am punching the spine board according to the same template. (Sooo much easier with an awl. I have always used tapestry needles and a thimble. Ouch.)
The beginning of the binding ...
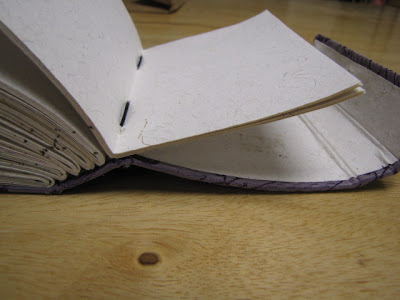
And the mostly completed book. I still have to attach the closure bead which must be somewhere in my stash at home. Somewhere.
The journal open. See the envelope on the front inside cover? That is for whatnots. (You can see it better up above.)
I like this binding a lot. I am very pleased. :)
So here is your enticement: Come to Sunne Spot and I will walk you through the binding and give you a sketch of the stitching pattern.
Now what magic thing will I have fill these pages?
Good night! Thanks for wandering through this with me.

Maine Media Workshops Visits Sunne Spot

Well, this summer has been a season of serendipity and good fortune for Sunne Spot. Through this and that little turn of fate I have met, and had the good fortune of working with, some wonderful artists.

One of my favorite groups of people to work with are parents with their children. I have had the astonishing and nigh on miraculous opportunity to work with my children over the years. I have a theory that keeping this practice of art - like meditation or prayer - is both intimate and healing when we regularly share it with someone. And when that someone is our child we parents are given a sweet way to deepen and strengthen both of us in the relationship. I welcome you to visit the Studio and test my theory. (!)

One of my favorite and regular moms, Beverly, happened to meet Clem Spaulding, a student at the local art school: Maine Media Workshops. Clem has been a still photographer in Texas for years and was taking a class to move his work into videography. In their conversation Clem found the subject of his Workshop video: Sunne Spot Studio.

You can see the result here at youtube:

Well, Clem showed the video to his longtime friend, photographer Judy Herrmann, also teaching at Maine Media Workshops this summer, and it turned out that Sunne Spot filled a need of hers and we were able to collaborate this past week.

Judy has been teaching "Jump Start Your Career", a course about using creativity in business develpoment. (It sounded so wonderful - wish I'da been there..) Judy wanted to have her students not only do the classroom work, but also to have an opportunity to just play, knowing that this kind of visual "what if-ing" gets all of our work re-charged.

How true.

Here they are at work: And here are some of the results. They painted, printed and stamped some papers on Tuesday ...
Then came back this morning to make paper chains, journals ...
(make some more papers)
make an Artist Trading Card (this one is called Paper Bag Elvis) ... (and is actually up on the Trading Rail waiting to be traded on...) and even origami.
I enjoyed working with the Workshop students very much. (Thank you all for visiting! Beautiful artwork.)
And I was delighted to be asked to brainstorm with teachers this summer.
I might be turning into a part time art consultant.
It is all good.

Thursday, August 26, 2010

India Journal In Continuation

You stayed tuned!
Hi again.
I figured out what I would do for binding strength and flexibility. Now, I have been home and had a chance to raid my fabric stash, but I thought that I would give this a try: window screening. (!) There are my cover boards all laid out ... and below are some papers to cover the insides of the boards ... but I needed something yummy - and long - for the outside ...
So I got out a brown paper bag and started scraping on some gesso and then some color.
The blues were too similar so I added a bit of white to smush around. Nice big, gross motor movement here.
While that was drying I glued the cardboard to the inside paper.
And now that the boards are drying under a stack of magazines I stenciled the paper for a bit more interest and activity.
Now that is drying and I am here writing to you.
Oh! I meant to tell you: I am calling this my India Journal because the little journal that I am copying was made in India. Mine of course, is being made here in Maine, USA. but that would be a less fun, thrilling, exotic name for me. (Now if I lived in India ...)
More tomorrow when everything dries. No, I have a class in here tomorrow ... well, I'll figure something out. I think that I will get to the binding tomorrow. I will draw you little pictures and how-tos. Then you can comment and link to what happens when you do this.
Stay more tuned.

Wednesday, August 25, 2010

India Journal Bookbinding

So, I bought a pad of acrylic painting paper, 9 x 12", and cut the pages in half the long way to make 40 pages, each of them 4.5" x 12". Then I folded them in half, divvied them into 5 signatures of 8 papers each - 16 pages. Next I took the sturdy back board to the pad and cut it not quite in half so that the cover boards would shelter the papers by being bigger. I made the back a bit longer too, which then made the front cover a bit shorter - but that is OK with me as there will be a front flap to cover any discrepancy - and even may make the flap easier to close.

Here are the covers laid out:
And here are the covers balanced in their eventual closed position:
The pages are so thick and sturdy (the better to paint them by) that the signatures pushed the center papers out. I decided to cut them even.
Next will come the part where I get the covers bound to each other and after that I will sew the signatures onto the back spine piece in the pretty pattern of the book that I am copying.
Now I have no fabric here at the Studio, and there is nothing quite as strong as fabric for a binding that will open and shut often. Hmm. Be patient and bring some in tomorrow? Or scrounge around here and see what I can find?
The mystery awaits a solution...
Stay tuned again.

Glue Drawings and Bookbinding

Good Morning. Some more painted glue drawings have dried, and I thought that I would show them to you. These will make wonderful medallions in my art journals. (We are not getting it in these photos, but the silver paint on top makes them shimmer.)
Add-a-Project: (as if I didn't have enough journals going...)
A friend gave me this journal back in 2004 and I started writing and gluing.
It is pretty stuffed full now. I love the structure a lot, and have always wanted to copy the binding.

So here goes.... I have my papers cut, I am off to cut the cover boards. I will photograph as I go along and let you see.

Stay tuned.

Sunday, August 22, 2010

tidbits and ATCs

Hmmm ... this picture is sideways. - Well, anyway, yesterday I taught some ATC tricks at the Rockport Library. First we took fun foam, like on the left, then covered it with metal tape (center), and then took slightly dulled pencils to draw into the foam/tape. The combination of soft foam and metal take the impression really well. We then cut out our shapes and added them to the watercolor crayon drawings that we had made.
The circle on the left is what happened when I drew into the plain tape - the circle on the right has the foam under it. See how rich the texture is? Great.
Then yesterday I also went to a yard sale and got some great little bits for the collage treasure chest of drawers at Sunne Spot. Dominoes and game pieces ...
Game money. :)
And excellent little treasures ...
Plus a spirograph for the Studio. We had fun today testing it out.

Friday, August 20, 2010

faux granite woven basket

It started here. Spray paint on brown paper. O.K., grocery bags. I started using it in a book/journal project but then I saw a picture of woven paper.
I had to.
A woven basket.
It is so fragile. I love the metallic sheen, the nubbly visual texture...

Results of some painted papers

This is sooooo cool: I saw this on a DVD of Julie Fei-Fan Balzer's called Collage: Fast and Furious. (Great show.) She is very generous with video and photos on her blog, here. Anyway, she shows this on her DVD: drawing a white glue resist. I used watercolor paper here: The next day, after it had dried thoroughly, I sprayed it with blue and red acrylic water that I made:
And here are a couple of photos of the dried paper:
A side view:
And the paint, being acrylic, not watercolor, will stay put on the glue as well as the paper. Great. Don't know what I will do with the paper ... make ATCs?? make a little book cover?? Hmm.
Oh! And I have seen this done lots of times before and have never figured it out: plastic wrap wrinkle texture. One paints, lays plastic wrap atop with wrinkles, lets dry and Voila! gets great texture. So I did ...
... but got these interesting but veeeery subtle textures:
The gold is lovely, but only at an angle.
THEN, I discovered the secret: I sprayed acrylic water on the paper (so it has to be quite wet!)
And I used a color that contrasts significantly from the color below.
Very successful, n'est-ce pas? Come see it quickly, before I cut it up into some project.