Hey there,
Just in case you were heading over on Friday the 1st, Sunne Spot needs to be closed on that day. I have somewhere I need to be just in the middle of the morning..
See you on Monday.
Robinsunne
Thursday, September 30, 2010
Wednesday, September 29, 2010
Fabric Transfer Drawings
Sunne Spot Studio welcomes homeschoolers to the Studio every Tuesday morning. Yesterday we made fabric crayon transfer drawings. Here was our process:
First was the drawing part: on plain paper we drew with these special fabric transfer crayons. They are very similar to drawing with regular crayolas - except only about 6 colors. Not a problem for our artist here who is a pro at blending and shading. Next we flipped the drawing onto polyester satin and ironed to transfer the colors with all of the prerequisite parchment paper protecting the iron and the board. A fussy process, but after a few tries the part about keeping the drawing from shifting and creating a kind of shadow effect got easier.
Note: you can find crayons that work with natural fibers, these happened to be the kind that only work with "man"-made fibers, thus: the polyester.
 This clever artist then cut her picture square from the fabric...
 ...(you can't really see this) and layered the fabric picture on the top with some WonderUnder fusible web to a square of felt underneath for stability.
 The ironing champion at work:
 And the results! That is my flower in the lower right. I have just started to hand stitch it, working along the lines to embellish the drawing. I can't wait to see how the anime girls look with stitching.

Homeschool kids are great to work with. Love it. Love it.
First was the drawing part: on plain paper we drew with these special fabric transfer crayons. They are very similar to drawing with regular crayolas - except only about 6 colors. Not a problem for our artist here who is a pro at blending and shading.
 Next we flipped the drawing onto polyester satin and ironed to transfer the colors with all of the prerequisite parchment paper protecting the iron and the board. A fussy process, but after a few tries the part about keeping the drawing from shifting and creating a kind of shadow effect got easier.
Note: you can find crayons that work with natural fibers, these happened to be the kind that only work with "man"-made fibers, thus: the polyester.
 This clever artist then cut her picture square from the fabric...
 ...(you can't really see this) and layered the fabric picture on the top with some WonderUnder fusible web to a square of felt underneath for stability.
 The ironing champion at work:
 And the results! That is my flower in the lower right. I have just started to hand stitch it, working along the lines to embellish the drawing. I can't wait to see how the anime girls look with stitching.
Homeschool kids are great to work with. Love it. Love it.
Tuesday, September 28, 2010
In A Scrape: Challenge
Blogging is so much fun: people sit around and think up ways to engage each other - me. How great is that?
Well Michelle Ward over at GPP Street Team put out a challenge: don't paint your surfaces - scrape them.
So I did. Here is what happened when I did it in the Studio's 1001 Journal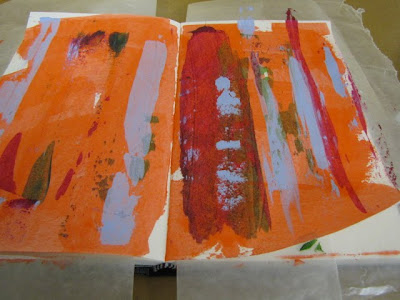 And here is what happened when I scraped the inside of a cereal box.
Well Michelle Ward over at GPP Street Team put out a challenge: don't paint your surfaces - scrape them.
So I did. Here is what happened when I did it in the Studio's 1001 Journal
And here is what happened when I scraped the inside of a cereal box.See those cool little polka dots? They come from holding the scraping card at a very low angle while running across the page.
 So take the paint onto the card in a thin layer an inch (5cm) or so up from the bottom (not just on the edge)
 and lay the card down pretty low to the paper as you scrape across. It makes the paint skip in bubbles and bursts across the page and the bottom edge is not pressed so fully down as to homoginize the line of paint.
 Cool, eh?
 Examples from other papers.
 Michelle has loads of links on her blog to see more scraped paint examples.

 They come from holding the scraping card at a very low angle while running across the page.
 So take the paint onto the card in a thin layer an inch (5cm) or so up from the bottom (not just on the edge)
 and lay the card down pretty low to the paper as you scrape across. It makes the paint skip in bubbles and bursts across the page and the bottom edge is not pressed so fully down as to homoginize the line of paint.
 Cool, eh?
 Examples from other papers.
 Michelle has loads of links on her blog to see more scraped paint examples.
How much is too much?
Well, its been days. One thing after another and I haven't matched my camera chip up (from the studio) up with my computer (at home).
Anyway ...
I spent a couple of days putting hand embroidery onto the crayon paper from last week. (See below for earlier posts about it if you are just tuning in.) The peice is kinda big (18 or so inches or maybe about 40cm square-ish) I had an idea about staying with just three different stitches: the herringbone, like in the pale blue checkerboard in the middle; a blanket stitch, as in the big circle on the right and the dark blue Xs below it; and the chain as in the smaller blue circle in the lower left. But I couldn't quite stick to that and used a running stitch (hmm .. not entirely satisfied there)
 After I decided that I had put enough embroidery on the piece I got to thinking about the question How much is too much? Or: how does one know when one is done? I had an artist in the studio this summer asking the same question. She was having so much fun that I thought her answer was probably "whenever you want to stop", or "whenever you have to give the piece back to its owner" (there was a schedule for this costume).
 and here:
 Do you want to know how I got the triangles and ovals to exactly match the stitched spaces?(this seemed vaguely brilliant and terribly fussy to me: I laid a piece of white tissue paper on top and traced and labeled each triangle, each little space. When I had cut them out I could put them on the section of painted paper that I wanted(either the dark blue parts or the white dotted parts) and set them in their proper places awaiting some gel medium for gluing. I glued and weighted all of the parts overnight to make sure that the corners stuck. It worked.
Anyway ...
I spent a couple of days putting hand embroidery onto the crayon paper from last week. (See below for earlier posts about it if you are just tuning in.) The peice is kinda big (18 or so inches or maybe about 40cm square-ish) I had an idea about staying with just three different stitches: the herringbone, like in the pale blue checkerboard in the middle; a blanket stitch, as in the big circle on the right and the dark blue Xs below it; and the chain as in the smaller blue circle in the lower left.
 But I couldn't quite stick to that and used a running stitch (hmm .. not entirely satisfied there)
 After I decided that I had put enough embroidery on the piece I got to thinking about the question How much is too much? Or: how does one know when one is done? I had an artist in the studio this summer asking the same question. She was having so much fun that I thought her answer was probably "whenever you want to stop", or "whenever you have to give the piece back to its owner" (there was a schedule for this costume).
But for this piece I thought that I would take it through several layers and media and see if I reached a state of Too Much.
Not yet apparently: I had some painted brown bag that worked beautifully with the colors of embroidery floss so began cutting and gluing them in place:
 and here:
 Do you want to know how I got the triangles and ovals to exactly match the stitched spaces?(this seemed vaguely brilliant and terribly fussy to me: I laid a piece of white tissue paper on top and traced and labeled each triangle, each little space. When I had cut them out I could put them on the section of painted paper that I wanted(either the dark blue parts or the white dotted parts) and set them in their proper places awaiting some gel medium for gluing. I glued and weighted all of the parts overnight to make sure that the corners stuck. It worked.
Still ready for more visual intrigue, I got out some acrylic paint and had at some surrounding areas:
 And here too: (very top and very bottom)
.jpg) And so, to date, the layers and stages of ornamentation include:
And so, to date, the layers and stages of ornamentation include:
 And here too: (very top and very bottom)
.jpg) And so, to date, the layers and stages of ornamentation include:
And so, to date, the layers and stages of ornamentation include: *crayon and other color sticks on brown paper
*acrylic paint wash
*crumpling
*iron on fusible
*paper cut
* tulle
*writing a poem-ish statement about Who Forgets and Who Remembers
*drawing in marker the general over-pattern inspired by Indian sari patchwork
*machine stitching to felt
*hand embroidery
*collage
*paint
Juicy.
We await the next step ...
Stay tuned.
Saturday, September 18, 2010
A Little Bit More Crayon Paper
I walked into the Studio two days ago and just had to try out some more things. Here I have crayon paper layered with a fusible layer, then a papercut, some tulle, a social statement, and a good deal of free machine stitching. Looks sooo cool on the back to me. Now I am in the hand stitching stage. I don't think that I am going to be able to hold back. This is gonna get encrusted with a whole lot of stitches and color and texture. Beads probably too. I mean it. I can't help myself.
 Yeah, yeah: that's a grocery bag there. You can see the printing on the back. The texture, the "hand" of the piece is so marvellous.
 Looks sooo cool on the back to me. Now I am in the hand stitching stage. I don't think that I am going to be able to hold back. This is gonna get encrusted with a whole lot of stitches and color and texture. Beads probably too. I mean it. I can't help myself.
 Yeah, yeah: that's a grocery bag there. You can see the printing on the back. The texture, the "hand" of the piece is so marvellous.
 Tuesday, September 14, 2010
crayon paper the end, maybe?
The second paper is finished! Embroidery, beads, buttons... Chain stitch on the left and blanket stitch on the right. Then an odd little feather stitch in the upper right.
 Green herringbone, red and pink French knots, red cross stitches and green and lavender closed feather stitches. I loved working on this paper. My hands felt a little waxy as I worked, but I liked the finished weight and texture a lot. I like the muted and blended colors very much.
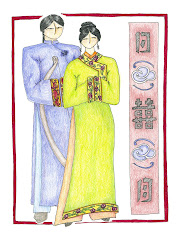
 I had a girl in the Studio this AM (the homeschoolers Tuesday morning group) who was curious about what I was doing so gave it a try. Look at her luscious eye. Great!
 Chain stitch on the left and blanket stitch on the right. Then an odd little feather stitch in the upper right.
 Green herringbone, red and pink French knots, red cross stitches and green and lavender closed feather stitches. I loved working on this paper. My hands felt a little waxy as I worked, but I liked the finished weight and texture a lot. I like the muted and blended colors very much.
 I had a girl in the Studio this AM (the homeschoolers Tuesday morning group) who was curious about what I was doing so gave it a try. Look at her luscious eye. Great!
crayon Paper In Continuance
("in continuance" ? Is that actual English?...)
Well, anyway, my fascination with these crayon papers continues. After having finished the first one (see the post below) I got back out my cray-pas and oil/water pastels and went over my other three papers that I configured from the rest of the paper bag. I added more color and lines here and there.
 I ironed again, but not so much as before. The ironing seems to take away a lot of the color. Of course it also melts the color right into the paper... so I guess that that is just a decision that we make. I got very interesting top sheets out of the ironing though:
 And here are my crumpled and then flattened papers. You'll see the paper in the middle is kind-of shiny. Jill - oh! I forgot to tell you: the author of the article in Quilting Arts magazine is Jill A. Kennedy. Anyway, Jill instructed to iron interfacing to the back of the papers - which I didn't do as I thought that the brown paper was pretty sturdy by itself, though you will see that I did back the papers with some acrylic felt when I started to stitch. Jill also instructed to iron WonderUnder onto the front of the paper. I am not sure why. I am thinking that it helps to adhere embellishments later on (basting isn't so possible on paper, leaving holes and all). So the fusible web leaves the paper shiny. I only fused one of the pieces. I haven't started hand embroidering that piece yet, so I don't know if it will warm in my hands and be sticky??? I will let you know.
 Here is some early machine stitching. As I did not bond the felt to the paper I had to take this beginning stitching slowly, working from the center out, so that I didn't get wrinkles.
 Then I started working in the fancier free machine stitching: (and you can see did not center the white felt evenly and had to snip the paper to even things out a bit.
 Here: some machine stitch patterns (yellow) mixed with free stitching (red):
 More free stitching:
 More of both kinds of stitching: I love how this looks.
 It has taken me all day to get this written. I started before breakfast, but had to stop due to a crashing lightning storm, it lessened, I wrote, I had to go to the studio, I stopped ...
Well, anyway, my fascination with these crayon papers continues. After having finished the first one (see the post below) I got back out my cray-pas and oil/water pastels and went over my other three papers that I configured from the rest of the paper bag.
 I added more color and lines here and there.
 I ironed again, but not so much as before. The ironing seems to take away a lot of the color. Of course it also melts the color right into the paper... so I guess that that is just a decision that we make. I got very interesting top sheets out of the ironing though:
 And here are my crumpled and then flattened papers. You'll see the paper in the middle is kind-of shiny. Jill - oh! I forgot to tell you: the author of the article in Quilting Arts magazine is Jill A. Kennedy. Anyway, Jill instructed to iron interfacing to the back of the papers - which I didn't do as I thought that the brown paper was pretty sturdy by itself, though you will see that I did back the papers with some acrylic felt when I started to stitch. Jill also instructed to iron WonderUnder onto the front of the paper. I am not sure why. I am thinking that it helps to adhere embellishments later on (basting isn't so possible on paper, leaving holes and all). So the fusible web leaves the paper shiny. I only fused one of the pieces. I haven't started hand embroidering that piece yet, so I don't know if it will warm in my hands and be sticky??? I will let you know.
 Here is some early machine stitching. As I did not bond the felt to the paper I had to take this beginning stitching slowly, working from the center out, so that I didn't get wrinkles.
 Then I started working in the fancier free machine stitching: (and you can see did not center the white felt evenly and had to snip the paper to even things out a bit.
 Here: some machine stitch patterns (yellow) mixed with free stitching (red):
 More free stitching:
 More of both kinds of stitching: I love how this looks.
 It has taken me all day to get this written. I started before breakfast, but had to stop due to a crashing lightning storm, it lessened, I wrote, I had to go to the studio, I stopped ...
Thursday, September 9, 2010
The Continuation of the Crayon Paper Adventure
The thrill continues: these were my tools yesterday: regular crayons like the article described. Then I thought that I would try cray-pas pastels and Portfolio's water color oil pastels as well - just to see what happened. Well the cray-pas and especially the water/oil pastels are such a dream to lay down color with.
 Then I sprayed again with my watered acrylic ... and rubbed it in with a paper towel.
 See? See? Nice rich colors with that muting of the blue.
 Like a goof I ironed it under freezer - not parchment - paper. (It all stuck together.) And it also came off on the freezer paper - so I am going to stitch on that too. Later.
 Well the cray-pas and especially the water/oil pastels are such a dream to lay down color with.
 Then I sprayed again with my watered acrylic ... and rubbed it in with a paper towel.
 See? See? Nice rich colors with that muting of the blue.
 Like a goof I ironed it under freezer - not parchment - paper. (It all stuck together.) And it also came off on the freezer paper - so I am going to stitch on that too. Later.
Then the article said to crumple the paper to soften it.
 Then I machine stitched it onto a backing of acrylic felt:
 Drew gold dots and then hand stitched. I like it.
 So tomorrow I will go back to the original crayon paper (see the post below) and draw/spray/stitch into that.
 Really, very nice texture and muting/blending softening of color, yeah?
 Then I machine stitched it onto a backing of acrylic felt:
 Drew gold dots and then hand stitched. I like it.
 So tomorrow I will go back to the original crayon paper (see the post below) and draw/spray/stitch into that.
 Really, very nice texture and muting/blending softening of color, yeah?
Tuesday, September 7, 2010
Making Crayon Paper
 Well, I am hale and hearty. I visited with a homeopath about the headaches and am having some very wierd dreams on the Constitutional, as well as a bit of luck staving off the sad behavior that begets the headaches. (See the entry below for why in the world I am chatting about my head health.)
So, back on board, I was perusing last summer's issue of QA>>>>>
and came upon this great article/lesson about making what I am calling "crayon paper".
Oh! And I am so sorry: I cut off her name in the picture of the article and the mag is not with me at the moment.

She starts with paper - like bond I think, or drawing weight? I started with brown paper bag because, well, I had it.
 And I got out my box of colors:
Drew a little like the article instructs.

Then, instead of using an ink wash, as she says, I decided to try my very watered down acrylic paint spray water.
Wow!
It worked sooo well!

I rubbed and scrubbed the now wet paper with a paper towel and the paint water gently soaked into the empty part that the crayon missed.

Then I kept drawing - there is something so calming and lovely about drawing with crayon on an old grocery bag: the materials are uber-inexpensive, crayons have a fit to one's hand and a scent to bring one comfort and sureity of talent ... what could go wrong?

And look what went so well.
I love this look.
Tomorrow I will give you some pics of the rest of her instructions ...
... which will include running the paper and backing of some kind through the sewing machine. :)
Subscribe to:
Posts (Atom)